Cloud: How to use Pix4D with Melown Cloud
November 9, 2017
Melown Cloud provides a simple way to present your Pix4D model in a web browser complete with surrounding terrain, Bing Maps aerial imagery and OpenStreetMap labels.
Recently, Pix4D added support to generate tiled Level-of-Detail (LOD) Mesh as an ESRI Scene Layer Package (slpk). To generate Tiled Mesh, we recommend to use the preview version of Pix4D Desktop (at least the version 4.1.10 released November 6th, 2017). This version contains several bug fixes regarding the mesh export and LOD generation. However, Pix4D recommends testing the preview version before using it for production work.
How to export the Triangle Mesh from Pix4D Desktop:
- On the Menu bar, click View > rayCloud.
-
On the left sidebar, in the Layers section expand the Triangle Meshes list and right click on the triangle mesh to be exported.

-
Click Export Mesh…, new pop-up window Export Mesh will appear:
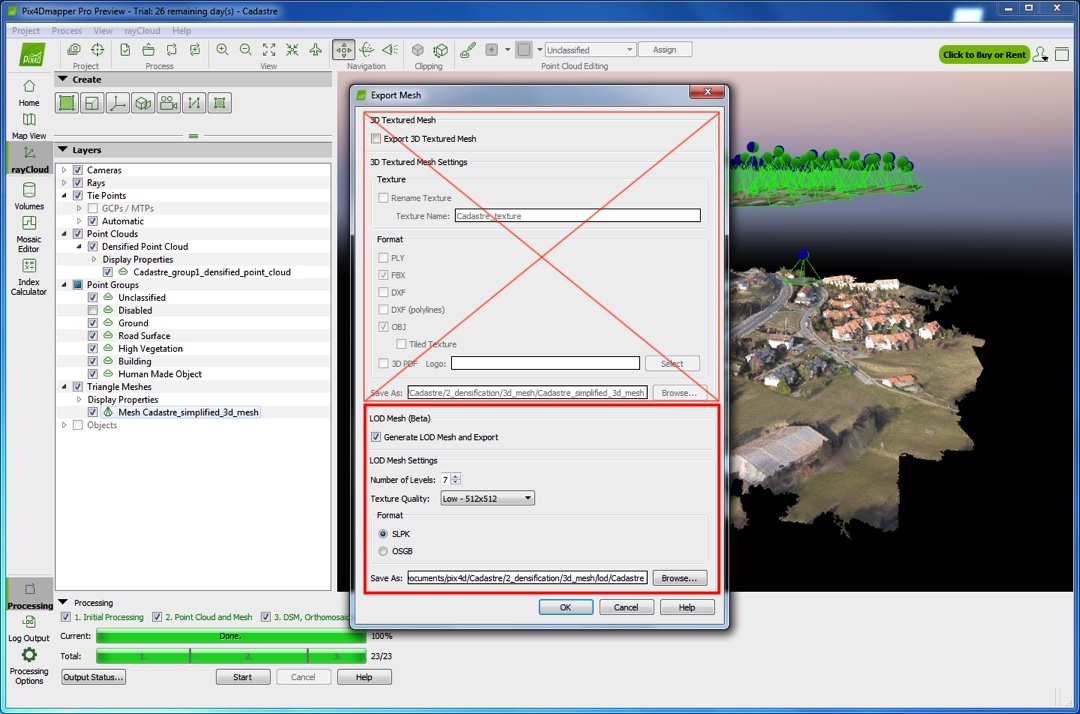
- Unselect Export 3D Textured Mesh.
- Select Generate LOD Mesh and Export to export the multi-LOD mesh.
- Select the LOD settings:
- Number of Level-of-Details: set to 7 to achieve the best result in Melown Cloud
- Texture Quality
- Export format: SLPK
- Click Browse… to navigate to the path where to save the LOD mesh.
- To export mesh click OK.
- When exporting is finished, a notification pop-up will appear. Click Open Folder and your LOD mesh is stored in lod subfolder.


Upload Dataset and Export it to Resources in Melown Cloud
Once you have your SLPK file, you can login to Melown Cloud, go to the ‘Datasets’ tab and drag&drop your file onto upload area.

The model undergoes a preliminary analysis and if everything is correct, you
should see something like this.

Name your Dataset and then click upload. Once the model is uploaded, it is further analyzed and becomes ‘Ready to export’. Melown Cloud uses notion of Datasets and Resources. Datasets represent raw uploaded data while Resources represent processed data that can be composed into a map.
To use your model in Melown Cloud you must therefore ‘Export’ your uploaded dataset into resource. The ‘Export’ button is located in a menu on the right side of the dataset.

If you make a mistake during georeferencing (such as using otrhometric height instead of ellipsoidal), the model may be floating above or below the actual terrain. Melown Cloud will try to detect this issue using global DEM and by analyzing your model. If the model does not fit the terrain, Melown Cloud will offer you to shift the model vertically. In case you do not like the result, you can always reexport the model with different shift. If the georeferencing error is too bad, you will need to correct it in Pix4D and repeat the whole upload process.
Exporting may take a while, depending on the size of the model.
Create New Map with your Resource
Once the export is finished, go to ‘Resources’ and into ‘True3D’ tab. There you will see your resource at the top. Click the menu on the right to ‘Create New Map’.

This will create a new map configuration in your Maps tab. By default it contains your resource, global Viewfinder 3” DEM with Bing Maps aerial imagery. After naming your map Melown Cloud takes to the Preview tab of this new map centered on your model.

You may now choose to use different resources in Resources tab, e.g. add some other model you uploaded or pick different global DEM. If you like the preview, you can go directly to Develop and Use tab. The map is not visible from outside Melown Cloud until you click Publish.

After you publish the map, it becomes accessible by ‘Direct link to map’, you can embed it in your webpage or build some fancy web application on the top of it with our VTS-Browser-JS API.
Here is a link on final map.
